Client Support Centre
Here we provide links to our remote support IT connection services, your Media Suite client profile for biling and project execution and resources for common utilities such as Email Managment, Email installation on popular applications and more!
Links
Resources
Email CPanel Overview
CPanel Email Management
The video below will provide a complete tour of your email management console (CPanel) for managing your custom email accounts hosted by Media Suite
Email Set Up on Apple Mail
Email Set Up Instructions For Apple Mail
Please follow the steps carefully, a single character error can cause email to not working properly. Please pay close attention to the accuracty of your submissions.
- Open Mac OS X Mail.
- Click Mail (top rigth).
- Click Accounts
- From the options to the right click "Add Other Account"
-
Fill in the following information:
- Full Name: How you want your name to appear in emails (example: John Smith)
- Email Address: Your full email address (example: john@your-domain.com)
- Password: Your email password - Click Continue.
-
Fill in the following information:
- Account Type: POP
- Description: Whatever you want (example: POP Account)
- Incoming mail server: mediasuite.ca
- User Name: Your full email address (example: john@your-domain.com)
- Password: Your email password - Click Continue.
- Click Connect if you receive a message about a security certificate.
-
Fill in the following information:
- Description: Whatever you want (example: POP Account)
- Outgoing Mail Server: mediasuite.ca
- Use only this server: Checked
- Use Authentication: Checked
- User Name: Your full mailbox address (example: john@your-domain.com)
- Password: Your mailbox password - Click Continue.
- Check Take account online.
- Click Create to complete the set-up.
Email Set Up on iPhone / iPad
Email Set Up Instructions For iPhone & iPad
Please follow the steps carefully, a single character error can cause email to not working properly. Please pay close attention to the accuracty of your submissions.
1. Go to your Settings App (Gear Icon) on your iPhone or iPad

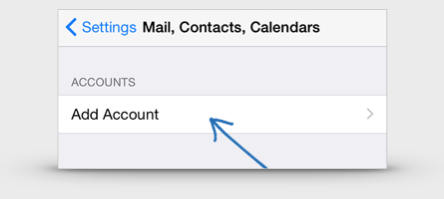
2. Select "Mail, Contacts, Calendars"

3. Select "Add Account"
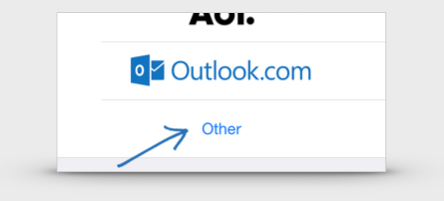
4. Select "Other"
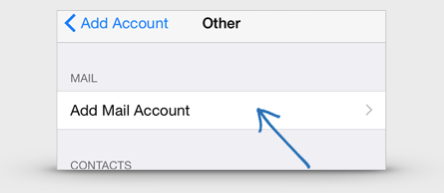
5. Select "Add Mail Account"
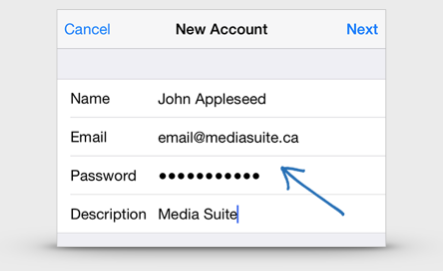
6. Account Details
Complete the requested details putting your name in the Name feild, your full email address, password (provided by Media Suite) and Description (most often your company name) and then click "Next" on the upper right.
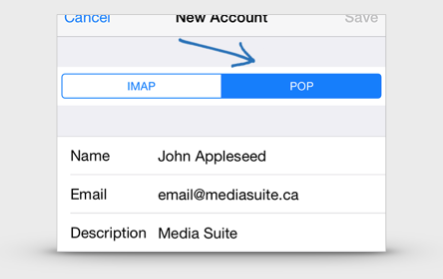
7. Account Type
Select POP at the top of this page. The Name, Email and Description fields should be already filled and carried over from the previous step. Once you have selected POP scroll down to complete the Incoming Mail Server.
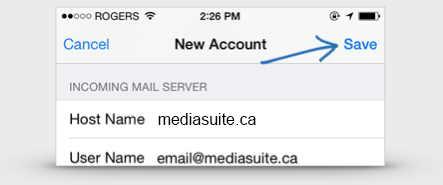
8. Incoming Mail Server
Under "Host Name" type mediasuite.ca, Username your entire email address and password is the password provided by Media Suite. Once you have selected POP scroll down to complete the Outgoing Mail Server.

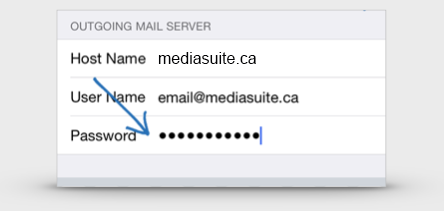
9. Outgoing Mail Server
Under "Host Name" type mediasuite.ca, Username your entire email address and password is the password provided by Media Suite. Note: Be very careful to get every character correct, a single charactor or case sensitive error will cause a problem with connection to your email.
10. Save Settings
Scroll to the top of the screen and click "Save". Once done you will see check marks briefly and the screen will move back to the accounts page. IMPORTANT: You may get a prompt stating that the server is not recognized, if you get this message please click "Continue"
IMPORTANT: Be very careful to get every character correct, a single charactor or case sensitive error will cause a problem with connection to your email.
The email setup for your Apple Device is now be complete. You can view your messages through your device's Mail app.
Email Set Up on Microsoft Outlook 2010
Email Set Up Instructions For Microsoft Outlook 2010
Please follow the steps carefully, a single character error can cause email to not working properly. Please pay close attention to the accuracty of your submissions.
- Open Outlook 2010.
- Click File.
- Select Info.
- Click Add Account.
- Select Manually configure server settings or additional server types.
- Click Next.
- Select Internet Email.
- Click Next.
-
Fill in the following information:
- Your Name: The name to display on your email
- Email Address: Your full email address
- Account Type: POP3 (same as POP)
- Incoming mail server: mediasuite.ca
- Outgoing mail server (SMTP): mediasuite.ca
- User Name: Your full email address
- Password: Your email password
- Remember password: We recommend that you keep this checked.
- Require logon using Secure Password Authentication (SPA): We recommend that you keep this unchecked. - Click More Settings.
- Click Outgoing Server.
- Check My outgoing server (SMTP) requires authentication.
- Select Use same settings as my incoming mail server.
- Click Advanced.
-
Fill in the following information:
- Incoming Server (POP3): 110
- Outgoing Server (SMTP): 587 - Click OK.
- Click Next to complete the set-up.
Email Set Up on Samsung Galaxy
Email Set Up Instructions For Samsung Galaxy
Please follow the steps carefully, a single character error can cause email to not working properly. Please pay close attention to the accuracty of your submissions.
To Get Started, from your home screen, touch:
 Menu
Menu  Settings
  Accounts
  Add account
  Email
Email  Others
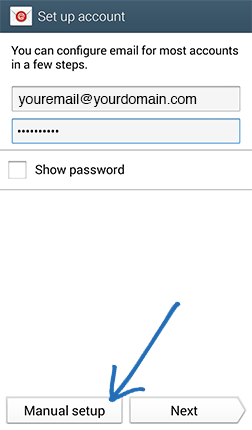 1. Enter your Email address and Password, and touch "Manual setup"
Because your email is related to a custom domain name you are required to select "Manual setup" because your server settings can not be automatically detected.
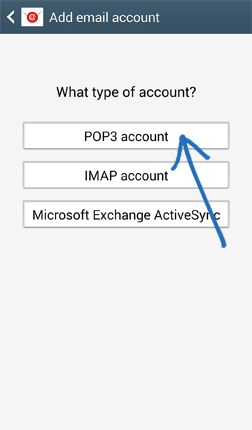 2. Select "POP3 account" from the list of options
IMAP Accounts can be created at your however we recommend you have IT support for syncing folders properly. IT support can be purchased by Media Suite if desired. IMAP accounts provide a synced mail system which can become convenient when you have multiple devices collecting email accounts. For a simplified and stable set up without please select POP3.
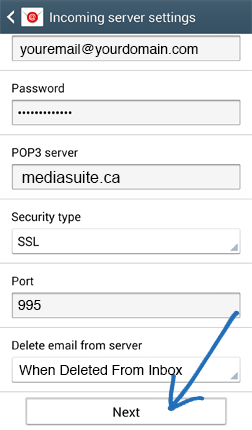 3. Submit your incoming mail settings
Starting with your username (your full email address) your password (provided by Media Suite). Then your POP3 Server (mediasuite.ca), Security Type (SSL), Port 995, then set the delete from email server to when you remove from inbox or other. Setting no deletion may result in your mailbox getting full and distruption to service. Your mailbox on the server can store up to 500mb. Once completed click "Next".
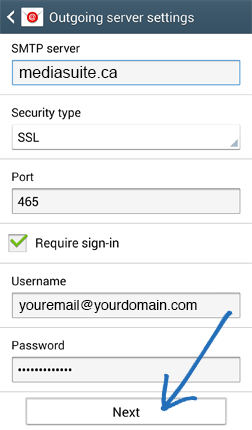 4. Submit your outgoing mail settings
Submit your SMTP Server (mediasuite.ca), Security Type (SSL), Port 465, Ensure that you have checked "Require sign-in" then submit your Username (full email address), Password (Provided by Media Suite). Once completed click "Next".
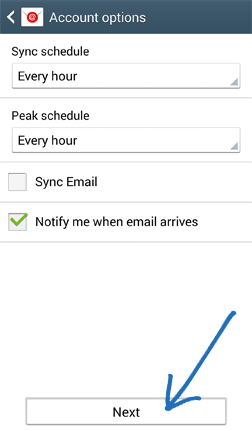 5. Establish Connection
Your device will attempt to connect to the outgoing server with the settings you have entered. If the connection is unsuccessful, you will be prompted to Edit details; confirm your settings and try again. If the connection is successful, you will be taken to the Account options screen below. UNCHECK "Sync Email" unless you are familiar with Samsung email sync service and then touch "Next".
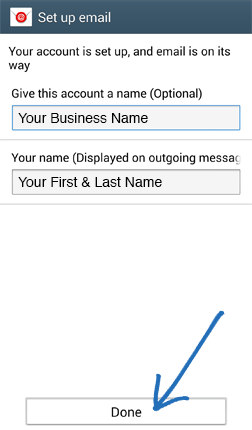 6. Final Set Up
You will be asked to give this internet mail account a unique on-screen name. The unique account name is used to differentiate this account from other email accounts on your mobile device, we recommend using your Businesses Name. Enter Your name as you would like it to be displayed on outgoing messages, we recommend your full name. Touch Done to complete the setup process.
All set, Your custom email is ready to use!
GoDaddy Domain Delegation
GoDaddy Domain Delegation
GoDaddy.com makes it easy to share access to your domain names with us so that we can take care of the technical detials of adjusting your DNS as needed to get your website online. The video below provides all the detail you need to connect us to your account.
Or, Follow These Steps
- Log into your GoDaddy account
- Click your name in the upper right
- Click "Account Settings"
- Scroll down and click the "Delegate Access" Square
- On the right column click "Grant Access"
- In the fields submit Name: "Media Suite" Email "info@mediasuite.ca"
- Under Access Level select "Products & Domains"
- Click "Invite"
Thats it!
What are your custom email settings?
Custom Email Application
We offer custom email as part of our website hosting packages. If you have a custom email set up please refer to the following credentials to help you set up your accounts on your computer or mobile devices email program (Microsoft Outlook, Windows Mail, Apple Mail, iPhone Mail etc..)
USERNAME: (This is your complete email address)
PASS: (Provided by us)
SSL (Optional): Enabled or Disable
Incoming Server: mediasuite.ca
POP Incoming Port: 110 (or 995 with SSL enabled) *recommended
IMAP Incoming Port: 143 (or 993 with SSL enabled)
Outgoing Server Authentication: Enabled
Outgoing Server: mediasuite.ca
Outgoing Port: 26 (or 465 with SSL enabled)